
In the last post I set up Beszel and deliberately kept it on the LAN. This time it's the opposite case: a service that should be public, reachable by anyone, on a clean address with a valid certificate. The example is this blog.
The blog runs on the same NAS as everything else I self-host. Getting it from "a container on my network" to "a website the world can open" takes three moving parts. Wire them up once and every future service follows the same path.
The three pieces
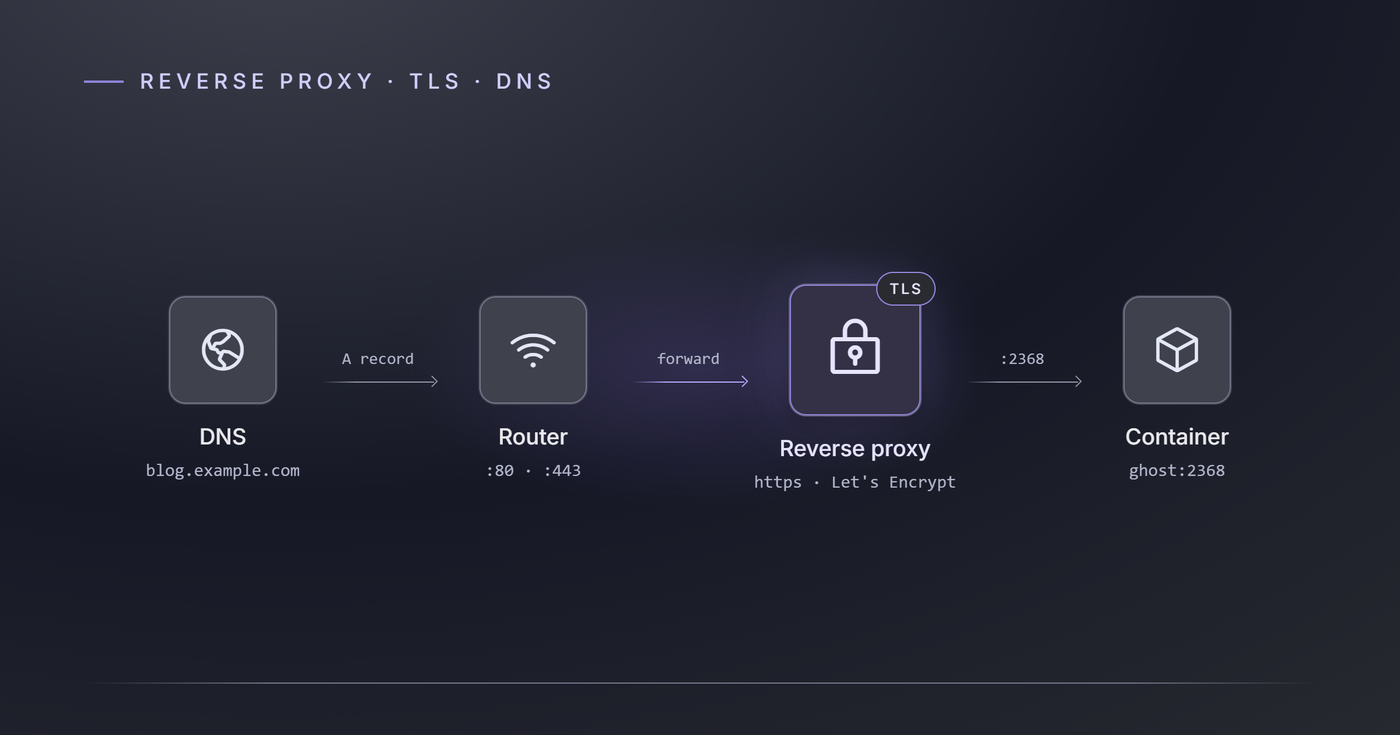
Exposing a self-hosted service comes down to three jobs:
- DNS turns a name (
blog.example.com) into your network's public IP address, so browsers know where to go. - Port forwarding lets that traffic actually reach the machine running your reverse proxy, instead of stopping at your router.
- A reverse proxy takes the incoming request, handles TLS (the https part), and passes it to the right container on the right internal port.
Miss any one and nothing works: without DNS the name resolves nowhere, without forwarding the request dies at the router, without a proxy there's nothing to answer it or serve a certificate.
Prerequisites
- A domain you control, with access to its DNS records (mine is at Hostinger; any registrar works).
- A host running the service you want to expose. Here that's Ghost on the NAS.
- A reverse proxy. I run NPMplus, a fork of Nginx Proxy Manager with a few extras. Plain Nginx Proxy Manager works the same way for everything below, and the web UI is nearly identical, so follow along with either.
- Access to your router, to forward two ports.
Step 1: Deploy the service as a Portainer stack
Ghost needs two containers: the app itself and a MySQL database. As a Portainer stack:
services:
  ghost:
    image: ghost:5-alpine
    container_name: ghost
    restart: unless-stopped
    ports:
      - 2368:2368
    environment:
      url: https://blog.example.com
      database__client: mysql
      database__connection__host: ghost-db
      database__connection__user: ghost
      database__connection__password: <db-password>
      database__connection__database: ghostdb
    volumes:
      - ./ghost_content:/var/lib/ghost/content
    depends_on:
      - ghost-db

  ghost-db:
    image: mysql:8
    container_name: ghost-db
    restart: unless-stopped
    environment:
      MYSQL_ROOT_PASSWORD: <root-password>
      MYSQL_USER: ghost
      MYSQL_PASSWORD: <db-password>
      MYSQL_DATABASE: ghostdb
    volumes:
      - ./ghost_db:/var/lib/mysql
Two things matter here. The url value has to be the public https address you'll serve the blog on, not an internal IP. Ghost bakes it into links, canonical URLs and the admin redirect, so getting it wrong means broken links later. And the app listens internally on port 2368. That's the port the reverse proxy will target; it isn't something you hand to the internet directly.
For advanced users: keep the database off the network
The MySQL container publishes no ports on purpose. Ghost reaches it over Docker's internal network by container name (
ghost-db), so the database isn't reachable from the LAN, let alone the internet. Only the app container needs a port, and even that only gets talked to by the proxy.depends_oncontrols start order but doesn't wait for MySQL to be ready, so if Ghost races ahead on the very first boot, one restart sorts it out.
Step 2: Point DNS at your network
In your DNS provider, create an A record for the subdomain pointing at your connection's public IP:
Type:  A
Name:  blog
Value: <your public IP>
That's the whole name-to-address mapping. Give it a few minutes to propagate, and blog.example.com resolves to your front door.
For advanced users: a dynamic IP that keeps changing
Most home connections don't get a fixed public IP. Mine changes every so often, which would break a static A record each time. The fix is dynamic DNS: a small updater that watches your public IP and rewrites the record whenever it changes. I run a DDNS container for my registrar, so the record always follows the current IP without me touching it. If your registrar has a DDNS API, there's usually a ready-made image for it.
Step 3: Forward the web ports
By default your router drops unsolicited inbound traffic. To let the outside reach your reverse proxy, forward the two standard web ports to the host running it:
443(https) for the actual traffic.80(http) for the redirect to https and, depending on your setup, certificate validation.
Point both at the internal IP of your reverse proxy host, and leave everything else closed.
For advanced users: why open 80, and a CGNAT caveat
Since you serve everything over https, forwarding only
443is tempting. Keep80open anyway: it lets you redirect plain-http visitors to https instead of dropping them on a dead port, and some certificate-validation methods use it. With DNS-based validation (below),80is only needed for that redirect.Check one thing first. Some ISPs put you behind CGNAT, where you share a public IP and can't forward ports at all. If the "public IP" shown in your router doesn't match what a what-is-my-ip site reports, that's the sign, and you'd need a tunnel or a small VPS relay instead. I have a routable public IP, so plain forwarding works.
Step 4: Create the proxy host
This is where the reverse proxy ties everything together. In the NPMplus web UI, add a new proxy host:
- Domain:
blog.example.com - Scheme:
http(the proxy speaks plain http to Ghost inside your network; the encryption sits between the visitor and the proxy) - Forward host: the internal IP of the Ghost host
- Forward port:
2368 - Enable Websockets support (Ghost's editor and some live features use them)
Then open the SSL tab, request a new Let's Encrypt certificate, and turn on Force SSL so every visitor ends up on https. Save.
Now https://blog.example.com should load your Ghost site with a valid padlock.
For advanced users: DNS validation vs HTTP validation
Let's Encrypt has to confirm you actually control the domain before it issues a certificate. The default HTTP challenge proves that by serving a token on port
80. A DNS challenge proves it a different way: the proxy creates a temporary TXT record through your DNS provider's API. I use the DNS challenge for two reasons. It works without exposing port80to the validation server, and it can issue wildcard certificates (*.example.com), so a single cert covers every subdomain I add later. The tradeoff is that the proxy needs an API token for your DNS provider, which is a secret worth scoping to just DNS edits.
One thing before you celebrate
The moment this works, your service is reachable by everyone, including the bots that scan the whole internet all day looking for login pages and known holes. A reverse proxy with TLS is the front door. It isn't a lock.
So add a protection layer before you get comfortable: rate limiting on login endpoints, automatic banning of IPs that misbehave, and ideally an intrusion-prevention system that reads your proxy logs and blocks attacks as they happen. That's a big enough subject for its own post, which is what I'll cover next: how I use CrowdSec to watch the proxy and ban bad traffic on its own.
The pattern
Strip away the specifics and every public service follows the same four steps: deploy the container, point DNS at your network, forward 80 and 443, and create a proxy host with a certificate. After that, one new DNS record and one new proxy host puts the next service live on its own subdomain in minutes.
This is the deliberate flip side of the Beszel post. Beszel had no reason to be public, so it stayed on the LAN. The blog is meant to be read, so it gets the full public path. The interesting decision is never how to expose something, it's whether to. Once the answer is yes, this is the recipe.
Running a different stack, or stuck on one of the steps? Reach out to me and I'll fold the good cases into later posts.
Disclosure: the Hostinger link is a referral link. If you sign up through it I get a small credit, at no extra cost to you. I only link to things I actually use, and Hostinger is where my own domain and DNS live.